Industrial UV Disinfection Systems protect water quality without adding chemical residuals, but they only deliver the required ultraviolet dose when lamps, quartz sleeves, sensors, controls, and water pretreatment are maintained correctly. This guide explains the maintenance process, required tools, inspection intervals, common mistakes, and purchasing considerations for industrial operators.
Guanyu develops water treatment equipment for industrial applications where stable disinfection, easy maintenance, and reliable technical support are essential. The following maintenance procedure can be adapted to drinking water, process water, wastewater reuse, and other industrial UV applications.
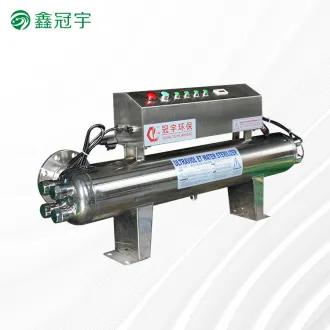
1. Understand What Industrial UV Disinfection System Maintenance Must Achieve
Maintenance is not limited to replacing UV lamps. The objective is to ensure that the system consistently delivers the required UV dose at the actual operating flow and water quality.
Maintain the required UV dose
UV dose depends mainly on UV intensity, exposure time, flow rate, lamp output, water transmittance, and quartz sleeve cleanliness. A system can appear to be operating normally while delivering insufficient disinfection if the lamp output has declined or the sleeve is coated with minerals.
During every maintenance activity, verify that:
- The flow rate is within the design range.
- The UV intensity reading is above the alarm threshold.
- The UV lamps are operating at the correct power.
- The quartz sleeves are clean and undamaged.
- The UV sensor is clean, calibrated, and correctly positioned.
- The water has acceptable UV transmittance and turbidity.
- The control panel records accurate operating data.
Reduce the main operating pain points
Purchasing groups and plant managers usually select an industrial UV system based on more than initial price. They need predictable performance, low downtime, simple service procedures, and clear lifetime costs.
Routine maintenance should therefore address these common concerns:
- Unexpected shutdowns caused by lamp or ballast failure.
- Reduced disinfection caused by fouling on quartz sleeves.
- Unclear lamp replacement timing and spare parts availability.
- False alarms caused by dirty or poorly calibrated UV sensors.
- High labor costs caused by difficult access to lamps and sleeves.
- Uncertain compliance records during audits.
- High energy consumption caused by inefficient lamp operation.
- Damage caused by incorrect cleaning chemicals or handling.
2. Prepare the Required Tools, Spare Parts, and Safety Equipment
Prepare all tools and replacement parts before shutting down the system. This reduces downtime and prevents operators from improvising with unsuitable equipment.
Required maintenance tools
- Lockout and tagout equipment.
- Insulated electrical tools.
- Non-abrasive lint-free cloths.
- Clean water or approved deionized water.
- Soft nylon brush or non-metallic cleaning pad.
- Approved citric acid cleaning solution for mineral scale, when permitted by the manufacturer.
- Approved cleaning solution for organic deposits, when required.
- Plastic container for removing and soaking quartz sleeves.
- Torque wrench for fittings and clamps.
- Flashlight for inspecting sleeves and chamber surfaces.
- Digital multimeter for electrical checks by qualified personnel.
- UV intensity meter or calibrated reference instrument, if required by the site procedure.
- Flow meter or access to the plant flow measurement system.
- Thermometer and pressure gauge, where applicable.
- Cleaning records, inspection forms, and calibration certificates.
Required spare parts
- Correct replacement UV lamps.
- Quartz sleeves compatible with the reactor model.
- O-rings and sealing gaskets.
- Ballasts, lamp connectors, and electrical terminal components.
- UV sensor window or sensor assembly.
- Wiper components for systems with automatic mechanical cleaning.
- Fuses and control panel spares.
- Manufacturer-approved cleaning chemicals.
Required personal protective equipment
- Safety glasses or a face shield.
- Chemical-resistant gloves.
- Cut-resistant gloves when handling quartz sleeves.
- Protective clothing and chemical apron.
- Safety shoes.
- Electrical protection required by the plant safety procedure.
Never look directly at an operating UV lamp. Ultraviolet radiation can injure the eyes and skin even when the lamp appears less bright than visible light.
3. Follow the Correct Shutdown and Isolation Procedure
The first maintenance step is to make the reactor safe. Do not open the chamber, remove a lamp, or disconnect a ballast while the system is energized or pressurized.
First step: Review the operating condition
- Check the maintenance work order and system history.
- Record the current flow rate, inlet pressure, outlet pressure, UV intensity, lamp hours, alarms, and water temperature.
- Confirm whether the system is part of a continuous production process.
- Arrange a bypass, backup disinfection unit, or temporary production plan if treated water must remain available.
- Notify affected operators before stopping the system.
Second step: Stop the water flow
- Reduce the upstream flow according to the plant operating procedure.
- Close the inlet valve to the UV reactor.
- Close the outlet valve if required by the system design.
- Open the designated drain or bypass valve slowly.
- Confirm that the reactor pressure has fallen to zero.
Third step: Isolate electrical energy
- Turn off the UV system using the normal control panel procedure.
- Switch off the main electrical disconnect.
- Apply lockout and tagout equipment.
- Test for absence of voltage using approved electrical procedures.
- Wait for lamps and electrical components to cool before handling them.
Fourth step: Confirm safe access
- Verify that no water pressure remains inside the reactor.
- Verify that UV lamps cannot restart automatically.
- Check for chemical cleaning residues from previous work.
- Place warning signs around the maintenance area.
- Use a second trained person for critical maintenance where site rules require it.
4. Inspect the Reactor, Connections, Lamps, and Controls
A visual inspection identifies developing problems before they cause a disinfection failure or an unplanned shutdown.
Inspect the reactor chamber and piping
- Look for leaks around flanges, end caps, drain ports, and instrument connections.
- Inspect the stainless steel chamber for corrosion, pitting, dents, or unusual discoloration.
- Check that pipe supports and reactor mounting hardware are secure.
- Inspect valves for signs of leakage or difficult operation.
- Confirm that the flow direction matches the system design.
- Check whether sediment or debris has accumulated near the reactor inlet.
Inspect the UV lamps
- Check the lamp operating hours recorded by the control panel.
- Look for darkening, cracks, broken connectors, or signs of overheating.
- Inspect lamp cables and connectors for moisture or heat damage.
- Confirm that each lamp is installed in the correct position.
- Compare the actual lamp status with the control panel indication.
- Replace lamps that have reached the manufacturer specified service life, even if they still produce visible light.
UV lamp output can decline over time without an obvious external failure. Lamp replacement intervals should be based on the manufacturer rating, operating hours, UV intensity trends, and the disinfection validation requirements.
Inspect the electrical cabinet and control system
- Check ballast status and alarm history.
- Inspect cooling fans and ventilation openings.
- Remove dust from the cabinet using the approved electrical cleaning method.
- Check for loose terminals, overheating marks, or damaged cable insulation.
- Confirm that emergency stop functions correctly.
- Verify that lamp failure and low UV alarms are active during the approved test procedure.
5. Clean the Quartz Sleeves and UV Sensor Step by Step
Quartz sleeve fouling is one of the most common reasons for low UV intensity. Hardness minerals, iron, manganese, biofilm, suspended solids, and organic deposits can block UV transmission even when lamps are new.
First step: Remove the lamp assembly safely
- Confirm that the system is locked out, depressurized, and cool.
- Remove the lamp connector according to the equipment manual.
- Support the lamp to prevent bending or impact.
- Slide the lamp out carefully without touching it with bare hands.
- Place the lamp on a clean padded surface.
Second step: Remove and inspect the quartz sleeve
- Remove the retaining nut, clamp, or end fitting.
- Support the quartz sleeve at both ends.
- Remove the sleeve without twisting or striking it against the chamber.
- Inspect the sleeve for cracks, chips, cloudiness, scratches, and permanent discoloration.
- Replace any sleeve that is damaged or cannot be cleaned to a clear condition.
- Inspect O-rings and replace hardened, flattened, cut, or swollen seals.
Third step: Clean mineral deposits
- Place the sleeve in a clean plastic container.
- Apply the manufacturer-approved acid cleaning solution, commonly a citric acid solution for mineral scale.
- Allow the solution to soak for the time specified by the equipment or chemical supplier.
- Use a soft nylon brush or lint-free cloth to remove loosened deposits.
- Do not use metal scrapers, abrasive pads, or sharp tools.
- Rinse the sleeve thoroughly with clean water.
- Repeat the process if deposits remain.
- Dry the sleeve with a clean lint-free cloth or allow it to air dry.
Fourth step: Clean organic deposits
Organic fouling and biofilm may require a different approved cleaning method. Never mix acidic cleaners with chlorine-based chemicals or other incompatible products.
- Identify the type of deposit before selecting a cleaning chemical.
- Use only the chemical concentration and contact time approved for the sleeve material.
- Keep the cleaning solution away from electrical connectors and lamp ends.
- Rinse until no chemical residue remains.
- Dispose of the cleaning solution according to local regulations.
Fifth step: Clean the UV sensor
- Remove or isolate the sensor according to the equipment design.
- Clean the sensor window gently with a lint-free cloth and approved cleaning solution.
- Do not scratch or polish the sensor window with abrasive material.
- Inspect the sensor seal and connector for moisture.
- Reinstall the sensor in the correct orientation.
- Check the sensor reading against the expected operating range after startup.
Sixth step: Reinstall the sleeve and lamp
- Install new or inspected O-rings in the correct grooves.
- Insert the quartz sleeve slowly and keep it aligned with the chamber opening.
- Install retaining hardware without overtightening.
- Check the manufacturer torque specification where one is provided.
- Insert the lamp without touching the glass with bare hands.
- Reconnect the lamp connector and confirm that it is fully seated.
- Inspect the assembly for gaps, pinched seals, or misalignment.
6. Verify Performance After Maintenance
Do not return the system to normal production immediately after cleaning or lamp replacement. A controlled startup confirms that the equipment is safe and that the required UV dose is being delivered.
First step: Perform a leak test
- Close the drain valve.
- Open the outlet valve if required.
- Open the inlet valve slowly to fill the reactor.
- Inspect all seals, fittings, end caps, and sensor connections.
- Hold the reactor under normal pressure for the site-defined inspection period.
- Stop and correct the problem if any leak is found.
Second step: Start the lamps
- Remove lockout equipment only after the authorized person confirms that the system is ready.
- Energize the control cabinet.
- Start the UV lamps according to the normal operating sequence.
- Confirm that each lamp status is shown correctly.
- Check for lamp failure, ballast, temperature, or door alarms.
- Allow the lamps to stabilize before recording UV intensity.
Third step: Confirm hydraulic performance
- Verify that the actual flow rate is within the validated design range.
- Check inlet and outlet pressure.
- Confirm that there is no air trapped in the reactor.
- Check for abnormal vibration, noise, or water hammer.
- Verify that the bypass valve is closed when treated water is required.
Fourth step: Confirm UV performance
- Record the UV intensity after the lamps reach stable operation.
- Compare the value with the normal baseline for clean sleeves and new lamps.
- Check the low UV alarm setpoint.
- Verify the UV transmittance measurement if the plant has an online monitor.
- Confirm that the dose calculation or validated operating table is still applicable.
- Take a water sample when required by the site quality plan.
- Document the maintenance date, parts replaced, readings, and technician name.
Fifth step: Confirm automatic protection functions
- Low UV intensity alarm.
- Lamp failure alarm.
- High temperature alarm.
- Low flow or high flow interlock.
- Power failure indication.
- Automatic wiper operation, if installed.
- Automatic shutdown or diversion of water when the UV dose is inadequate.
7. Use a Preventive Maintenance Schedule
A clear maintenance schedule helps purchasing teams estimate spare parts, labor, chemical consumption, and downtime. The exact interval should follow the equipment manual and site water conditions.
Daily or per-shift checks
- Check UV intensity.
- Check flow rate and pressure.
- Check lamp and ballast status.
- Review active alarms and alarm history.
- Check for visible leaks.
- Confirm that the control panel is recording data.
- Verify that treated water is not flowing through a bypass unintentionally.
Weekly checks
- Inspect the reactor exterior and electrical cabinet.
- Check sensor readings for unusual changes.
- Inspect automatic wiper operation, if installed.
- Review UV intensity trends rather than only the current reading.
- Check the condition of the inlet screen or pretreatment equipment.
Monthly checks
- Inspect lamp connectors and cable glands.
- Check flange bolts and accessible fittings.
- Clean the sensor window if the reading shows a gradual decline.
- Compare energy consumption with the normal operating baseline.
- Review water turbidity, color, hardness, iron, manganese, and UV transmittance data.
Quarterly or condition-based checks
- Remove and clean quartz sleeves when UV intensity declines or fouling is visible.
- Inspect O-rings and replace them when needed.
- Test alarm and interlock functions.
- Verify UV sensor calibration according to the calibration schedule.
- Inspect the electrical cabinet for heat damage or loose connections.
Annual checks
- Replace lamps according to rated service life and actual performance history.
- Replace aging O-rings and sealing components.
- Inspect quartz sleeves for permanent clouding or surface damage.
- Calibrate sensors and measuring instruments.
- Review the system against current flow, water quality, and production requirements.
- Update the spare parts inventory.
- Review the total cost of ownership with the equipment supplier.
8. Avoid Common Industrial UV Maintenance Mistakes
Mistake 1: Replacing lamps without cleaning the sleeves
New lamps cannot compensate for heavily fouled quartz sleeves. Always inspect and clean the sleeves when lamp output is low or when lamps are replaced.
Mistake 2: Using abrasive tools on quartz
Scratches reduce sleeve strength and can create stress points. Use only soft, non-abrasive cleaning materials approved for quartz.
Mistake 3: Touching lamps with bare hands
Oil from skin can create hot spots and shorten lamp life. Wear clean gloves and follow the lamp handling instructions.
Mistake 4: Ignoring water pretreatment
High turbidity, suspended solids, iron, manganese, hardness, and color can reduce UV transmittance and increase fouling. Maintenance should include checks on filters, clarifiers, softeners, and other pretreatment equipment.
Mistake 5: Operating above the design flow
Excessive flow reduces exposure time and may reduce the delivered UV dose. Confirm that pumps and control valves cannot push the reactor beyond its validated flow range.
Mistake 6: Treating visible light as proof of UV performance
A lamp may still glow while its germicidal UV output is below the required level. Use UV intensity, lamp hours, dose calculations, and validated operating data instead of visual appearance.
Mistake 7: Cleaning with incompatible chemicals
Incorrect chemicals can damage quartz, O-rings, stainless steel, sensors, or electrical components. Use only approved chemicals and never mix cleaning agents unless the chemical supplier explicitly permits it.
Mistake 8: Skipping records
Without records, operators cannot identify gradual performance loss or prove that maintenance was completed. Record readings before and after every major service activity.
9. Select an Industrial UV Disinfection System That Is Easy to Maintain
Maintenance requirements should be reviewed before purchase. A low purchase price can become expensive if the system requires frequent shutdowns, specialized labor, or difficult-to-source parts.
Check the system design
- Accessible lamp and quartz sleeve removal.
- Clear lamp status and UV intensity display.
- Automatic mechanical or chemical cleaning options where appropriate.
- Reliable low UV and lamp failure alarms.
- Suitable stainless steel chamber material.
- Validated performance at the required flow and UV transmittance.
- Simple drainage and pressure isolation.
- Easy access to sensors, ballasts, connectors, and seals.
Check operating and ownership costs
- Expected lamp service life.
- Annual lamp replacement cost.
- Quartz sleeve and O-ring replacement cost.
- Energy consumption at normal flow.
- Cleaning chemical consumption.
- Required labor hours per maintenance event.
- Calibration and service requirements.
- Availability of local technical support.
- Availability and delivery time of spare parts.
Ask the supplier for technical documentation
Before placing an order, request the following information:
- UV dose validation data.
- Flow and UV transmittance design limits.
- Lamp replacement instructions.
- Quartz sleeve cleaning procedure.
- Recommended maintenance intervals.
- Electrical diagrams and control logic.
- Alarm and interlock descriptions.
- Spare parts list.
- Warranty terms.
- Training and after-sales service details.
10. Create a Practical Maintenance Record
A maintenance record should allow a new operator, auditor, or service engineer to understand the complete history of the equipment.
Record the following information
- System identification number.
- Maintenance date and time.
- Technician and reviewer names.
- Operating hours and lamp hours.
- Flow rate and pressure.
- UV intensity before and after maintenance.
- UV transmittance and turbidity, when available.
- Quartz sleeve condition.
- Lamp condition and replacement details.
- Sensor cleaning and calibration status.
- O-ring and gasket condition.
- Alarm and interlock test results.
- Cleaning chemicals and concentrations used.
- Leaks, defects, and corrective actions.
- Next scheduled maintenance date.
Use trend data to plan service
Trend data is more useful than a single reading. A gradual decline in UV intensity may indicate sleeve fouling, lamp aging, sensor contamination, poor water quality, or a failing ballast. Identifying the trend early helps the plant schedule maintenance rather than responding to an emergency shutdown.
Final Checklist for Reliable UV Disinfection
- Review current operating data and maintenance history.
- Prepare tools, spare parts, cleaning materials, and protective equipment.
- Shut down, depressurize, isolate, and lock out the system.
- Inspect the chamber, piping, lamps, sensor, ballasts, and control panel.
- Clean or replace quartz sleeves and inspect all seals.
- Clean and verify the UV sensor.
- Reinstall lamps and sleeves without impact or overtightening.
- Perform a controlled leak test and startup.
- Verify flow, UV intensity, alarms, interlocks, and treated water routing.
- Record every result and schedule the next maintenance activity.
Well-planned maintenance keeps UV Disinfection Systems operating at the validated dose, reduces unplanned downtime, and improves confidence in water quality. By selecting an accessible system, monitoring performance trends, and following the correct cleaning and safety procedures, industrial facilities can control lifetime costs and maintain reliable treatment. Guanyu can support industrial users with UV water treatment equipment, application guidance, spare parts planning, and maintenance-focused system solutions.